Before mapping Smart Order channel manager to any channel(OTA), please complete the following settings in PMS. This ensures your room inventory and rates are accurate and synchronized from the first day of connection.
I. Add Room Types and Rooms
(A) What to do:
Create room types and individual rooms in PMS that are exactly the same as your listings on the OTA. Please make sure the Maximum Occupancy (maximum number of guests allowed) for each room type is exactly the same as what you have set on the OTA side.
(B) PATH:
Go to Settings →Room Type → Add
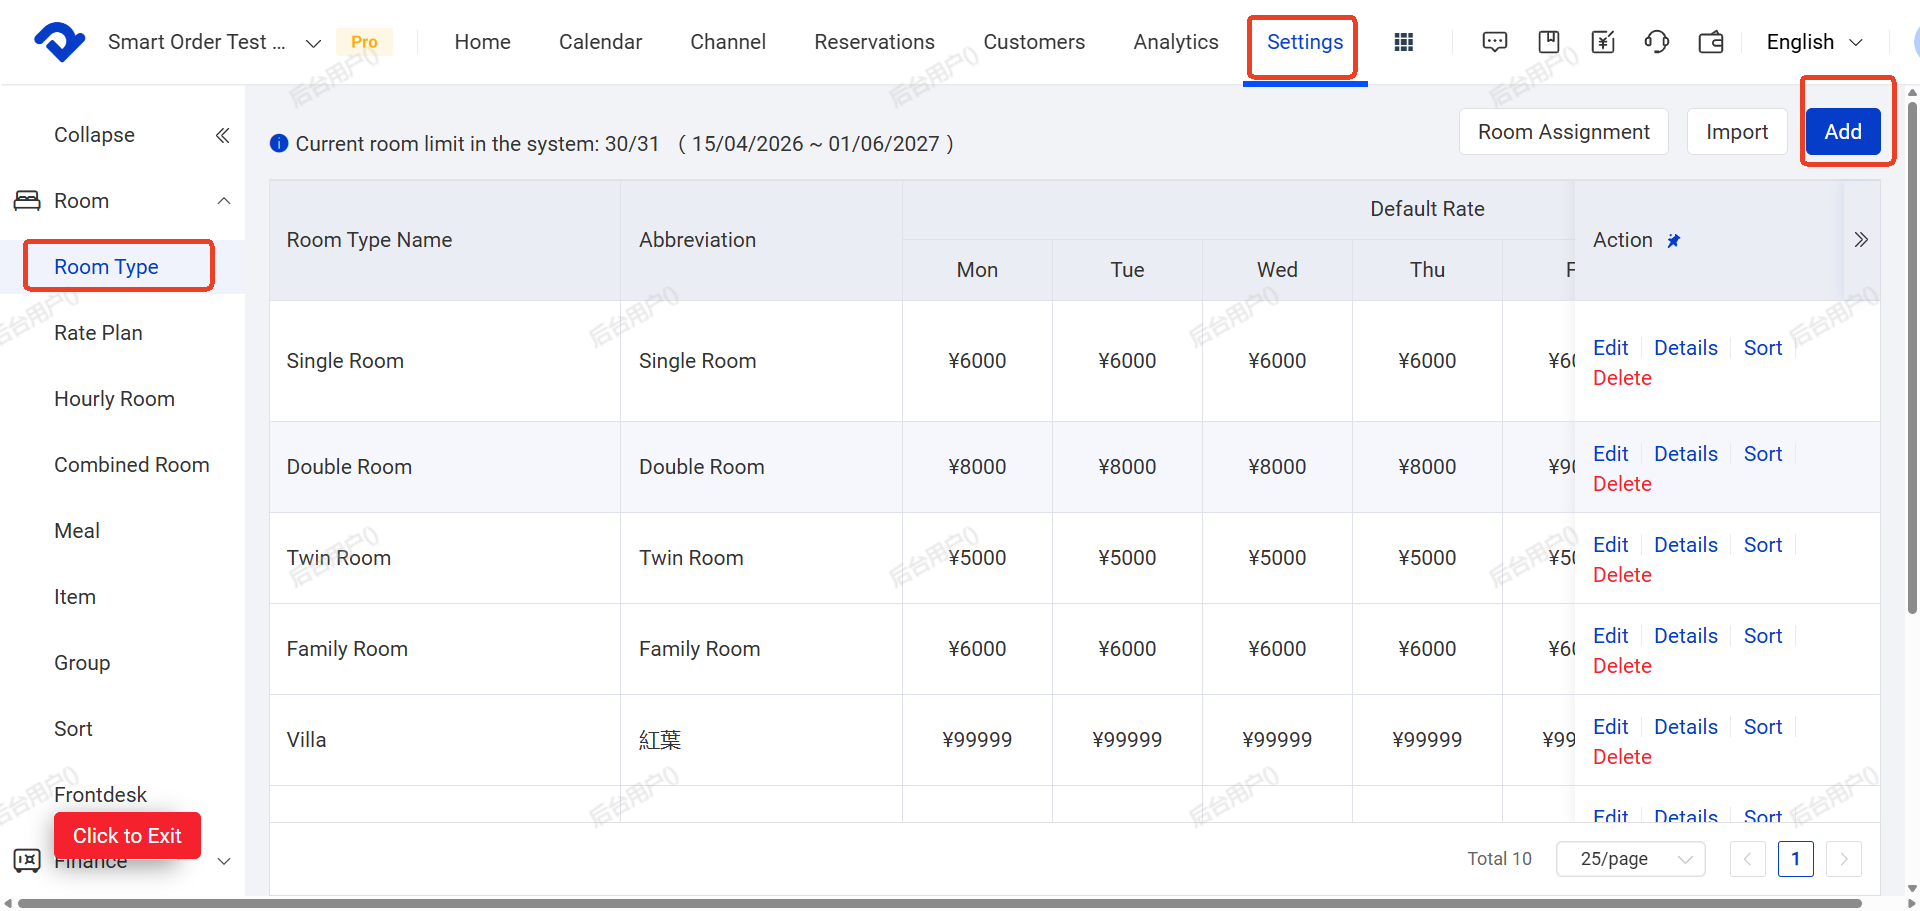
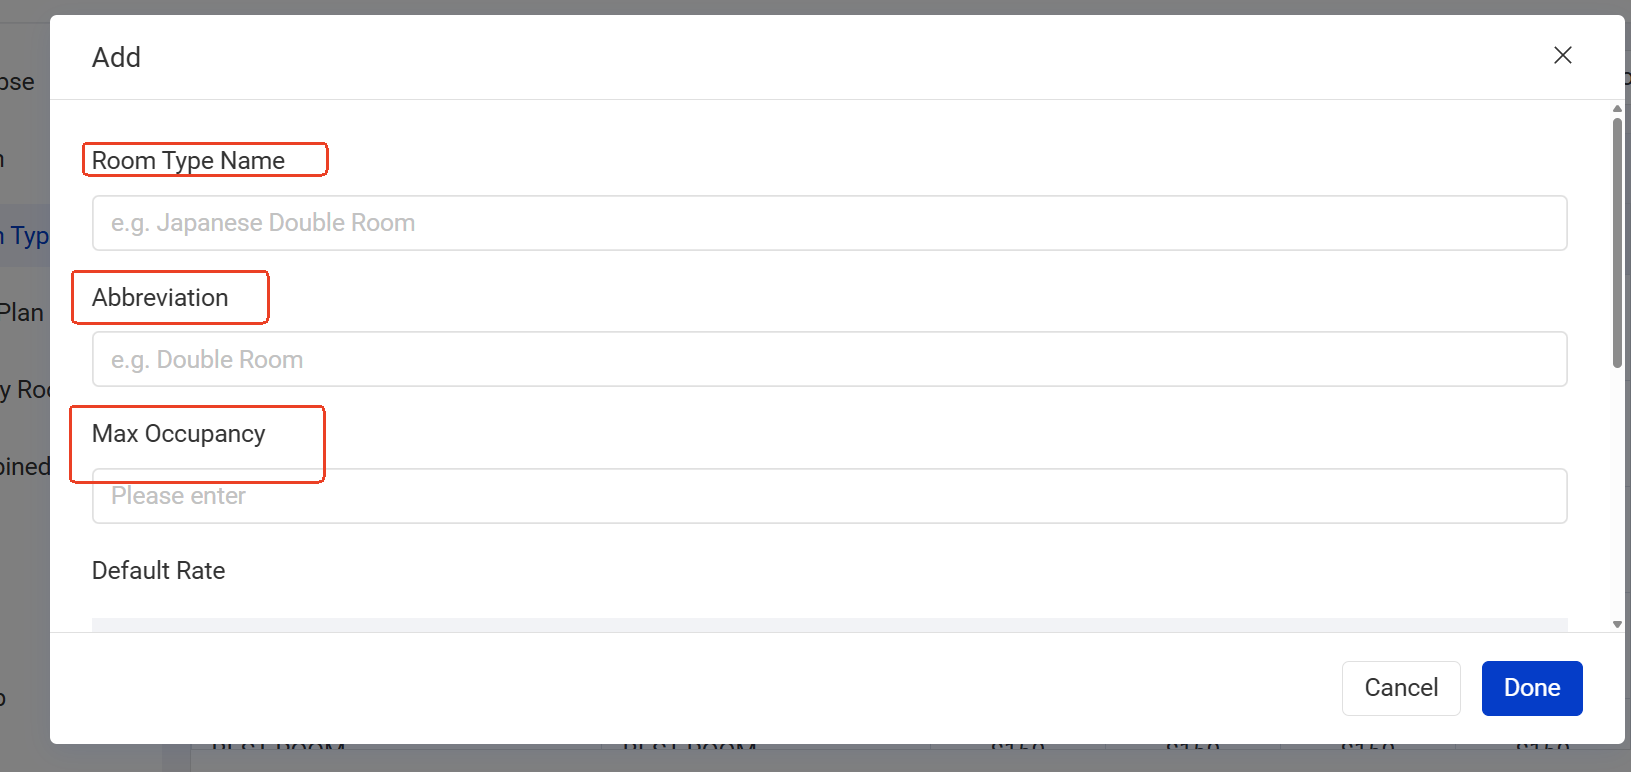
After clicking ‘’ADD” room, You will be taken to the Rate Type Details page.
Fields to complete as following steps:
- A. Room Type Name: The name guests will see (e.g. on self check-in). Must be unique if you have multiple types.
- B. Abbreviation: Internal short name (visible only inside PMS).
- C. Max Occupancy: Must match the OTA exactly. Incorrect max occupancy may cause rate push failures.
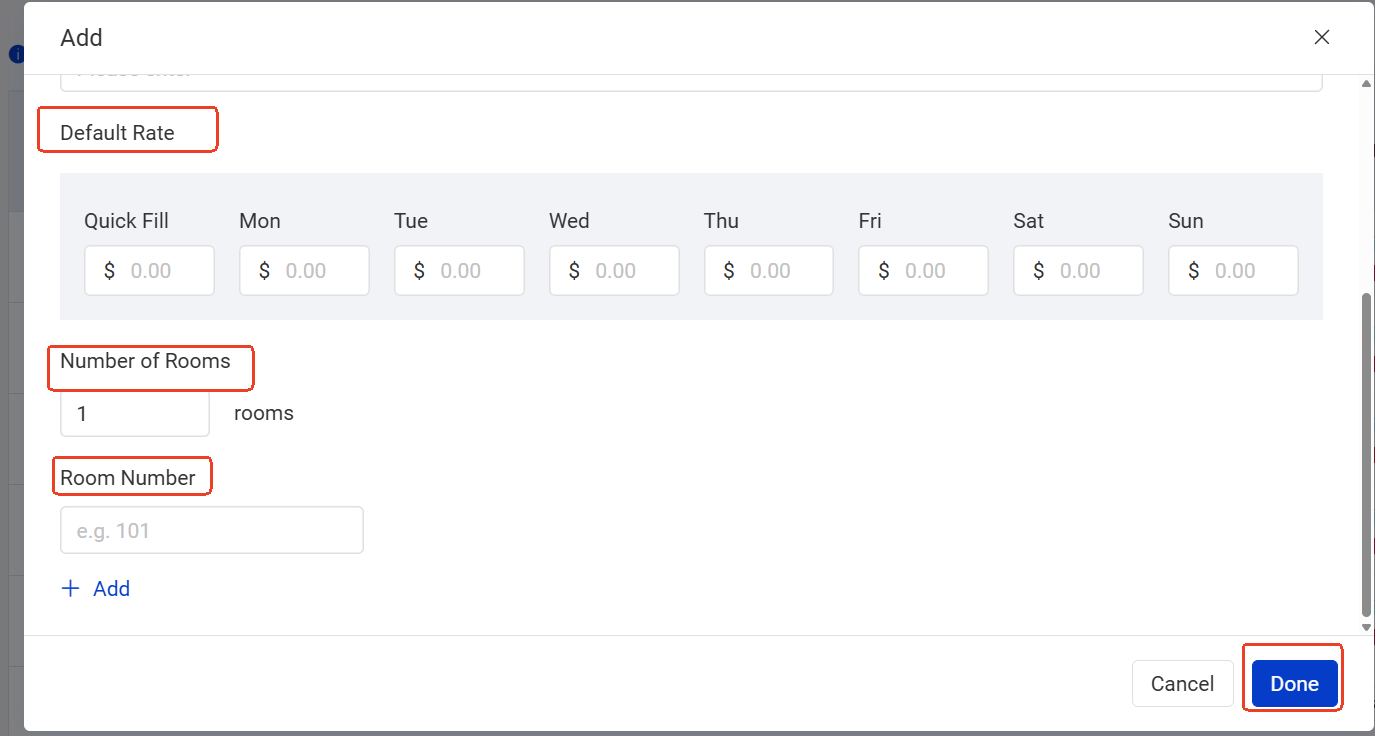
- D. Default Rack Rate: The system will automatically fill future dates with this price as initial rate.The effective period is approximately 1–2 years
- E. Number of Rooms
- F. Room Numbers
Click DONE to save. The room type is now created.
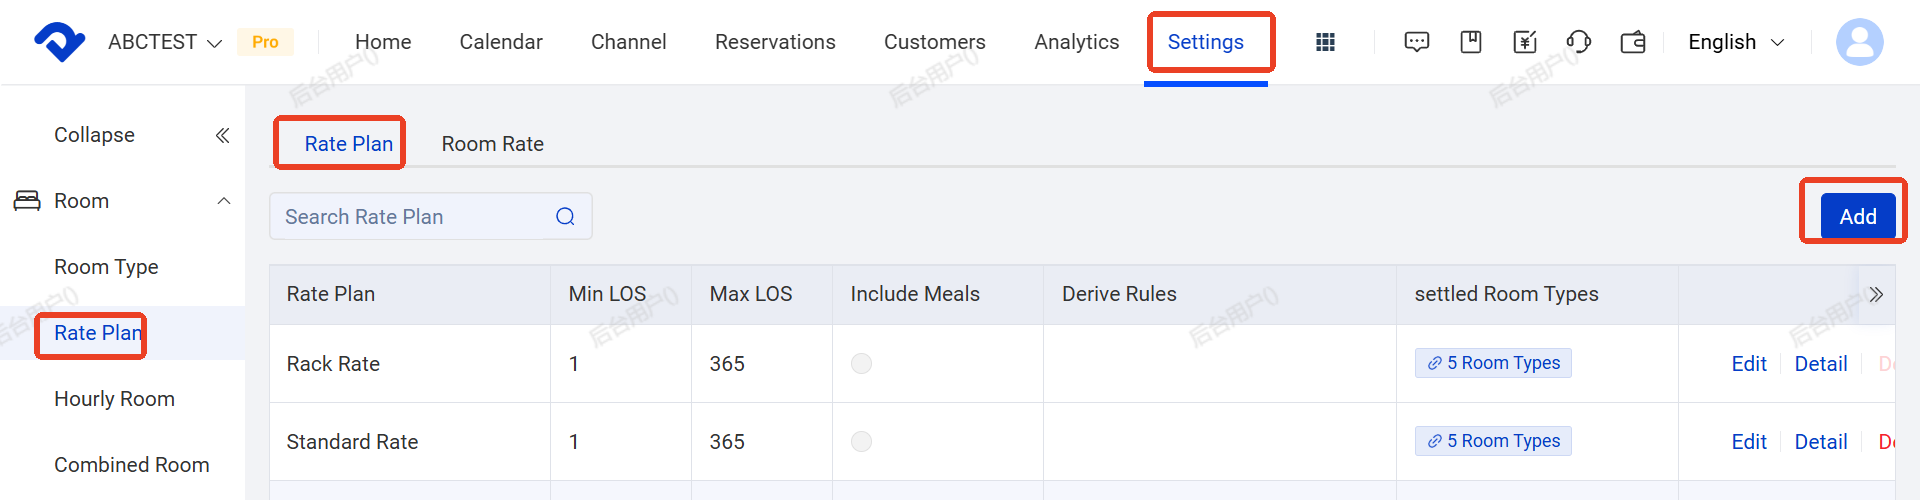
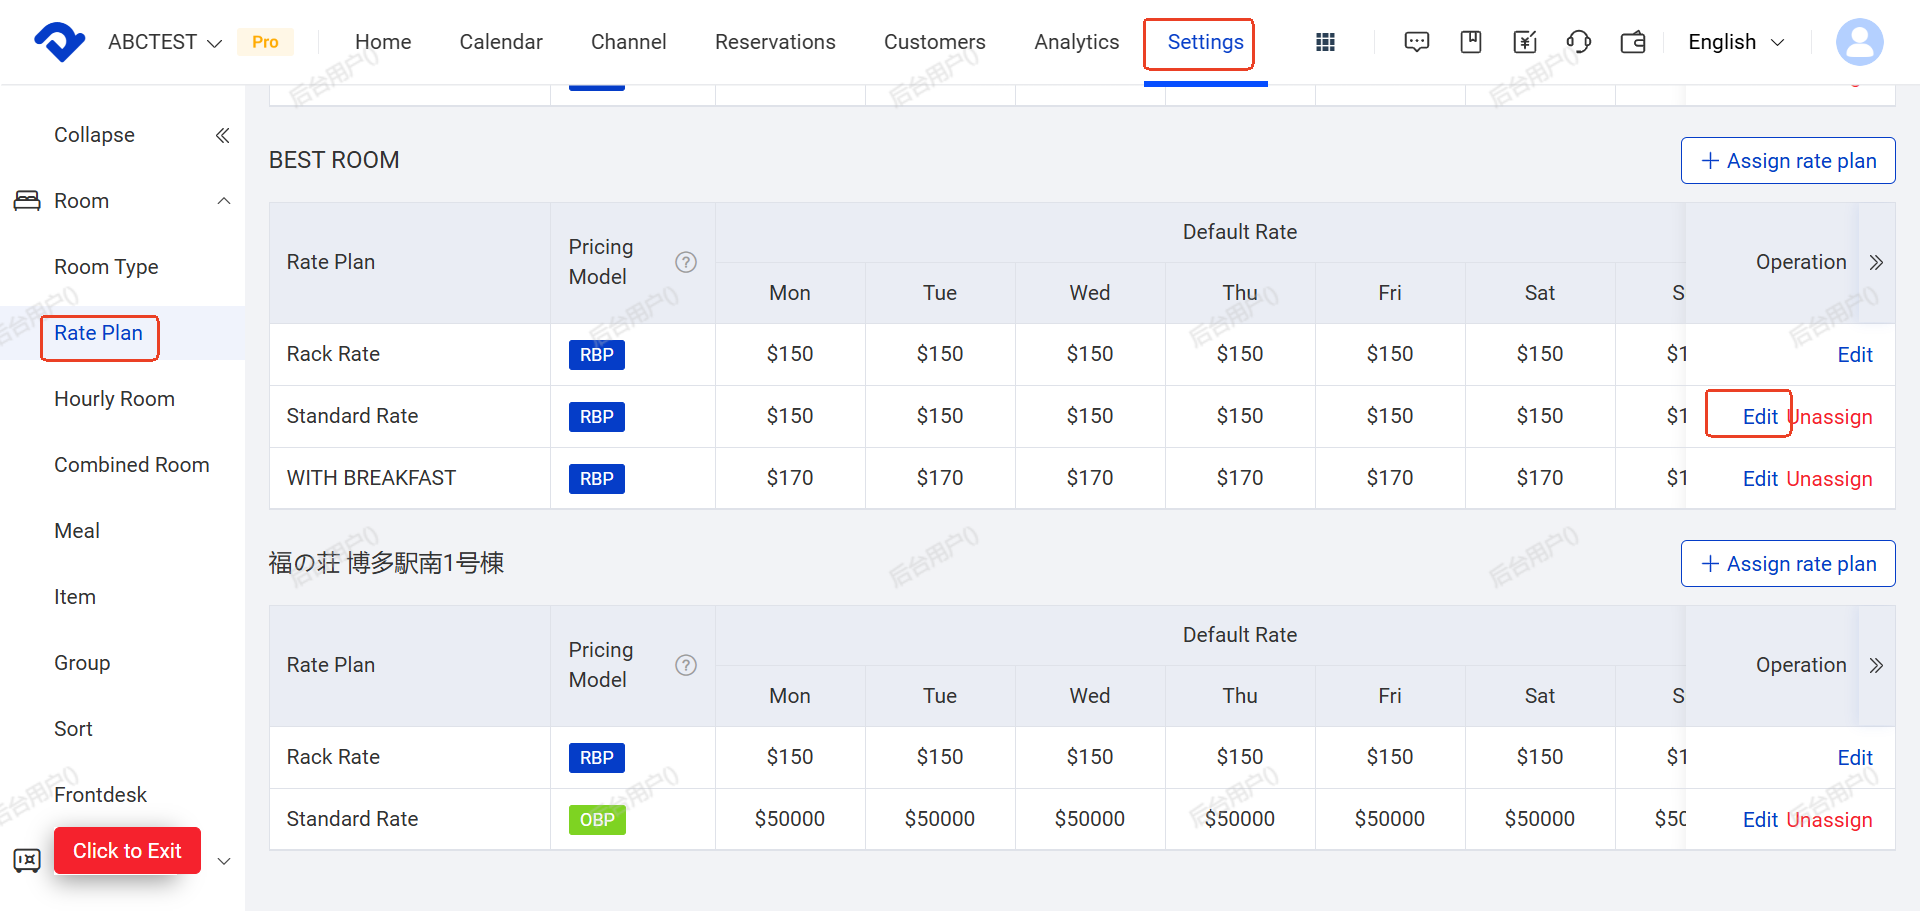
II. Set Rate Plans & Channel Pricing
(A) After adding rooms, PMS automatically creates two defaut rate plans in Rate Plan page:
- Rack Rate → Only for walk-in guests (cannot connect to OTAs)
- Standard Rate → This one can be used for OTA connection
(B) Set the base prices for all room types in PMS. These prices will be sent to the OTAs.
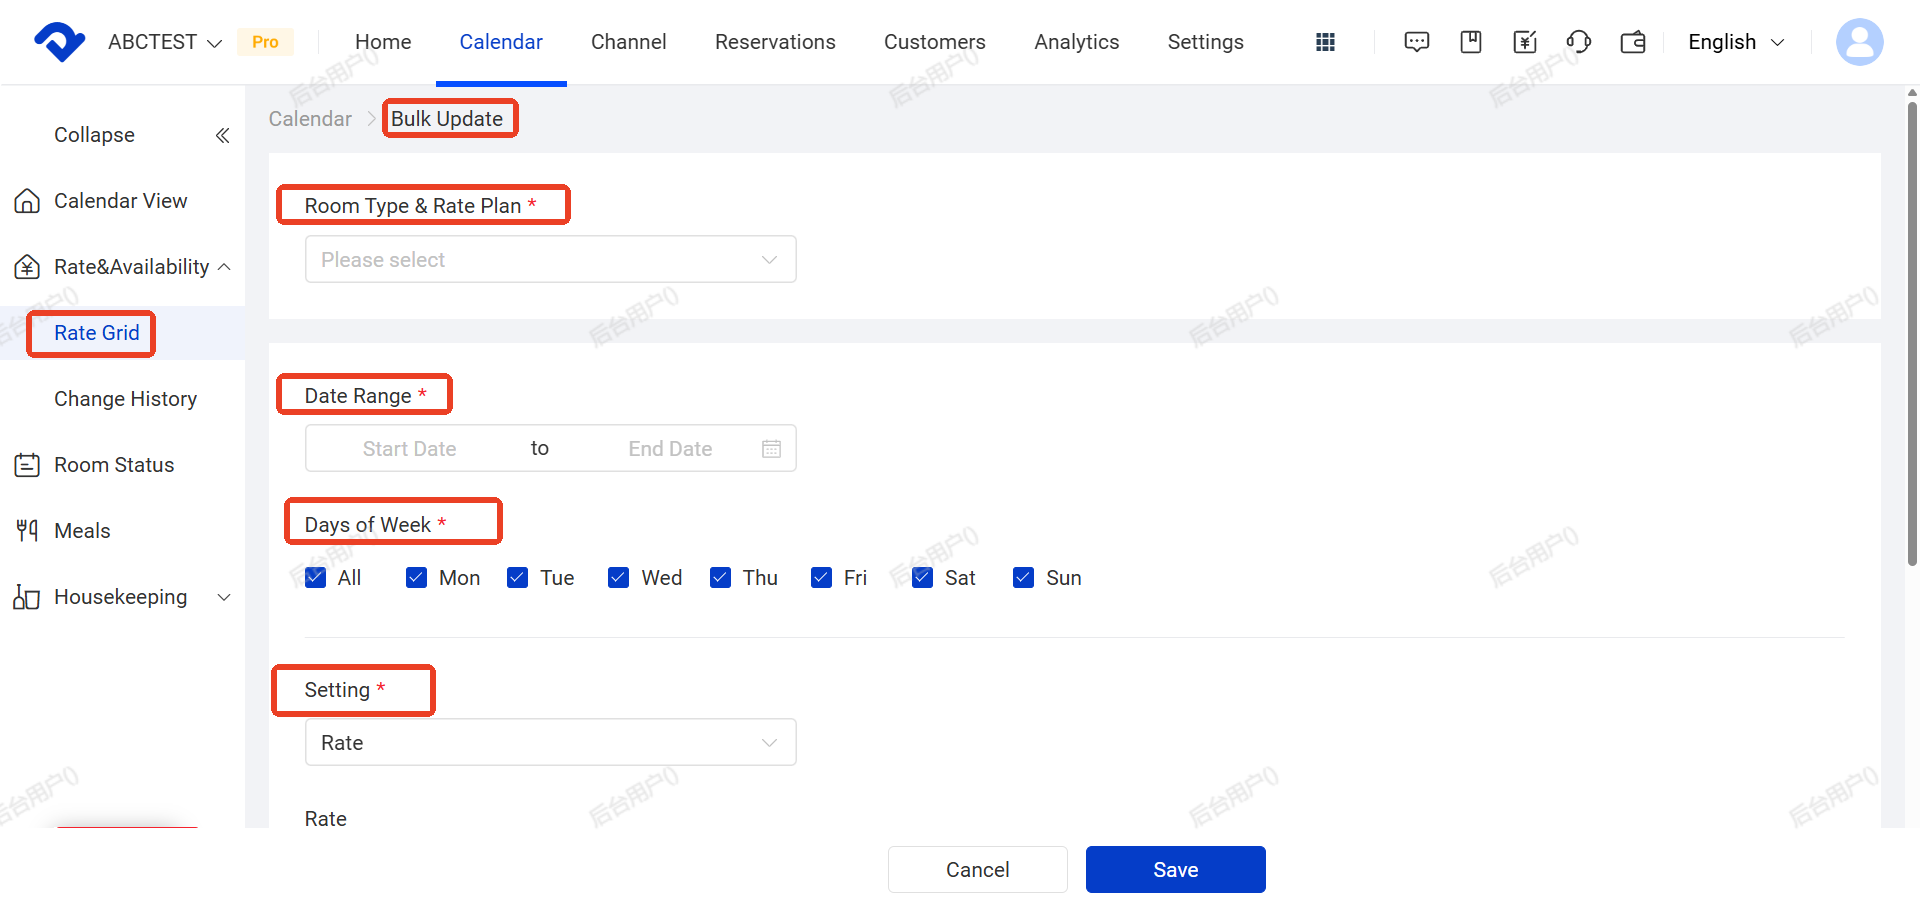
- If you don’t need to create multiple price plans, it means you do not need to manage separate pricing strategies for different channels.You can simply adjust standard rate.
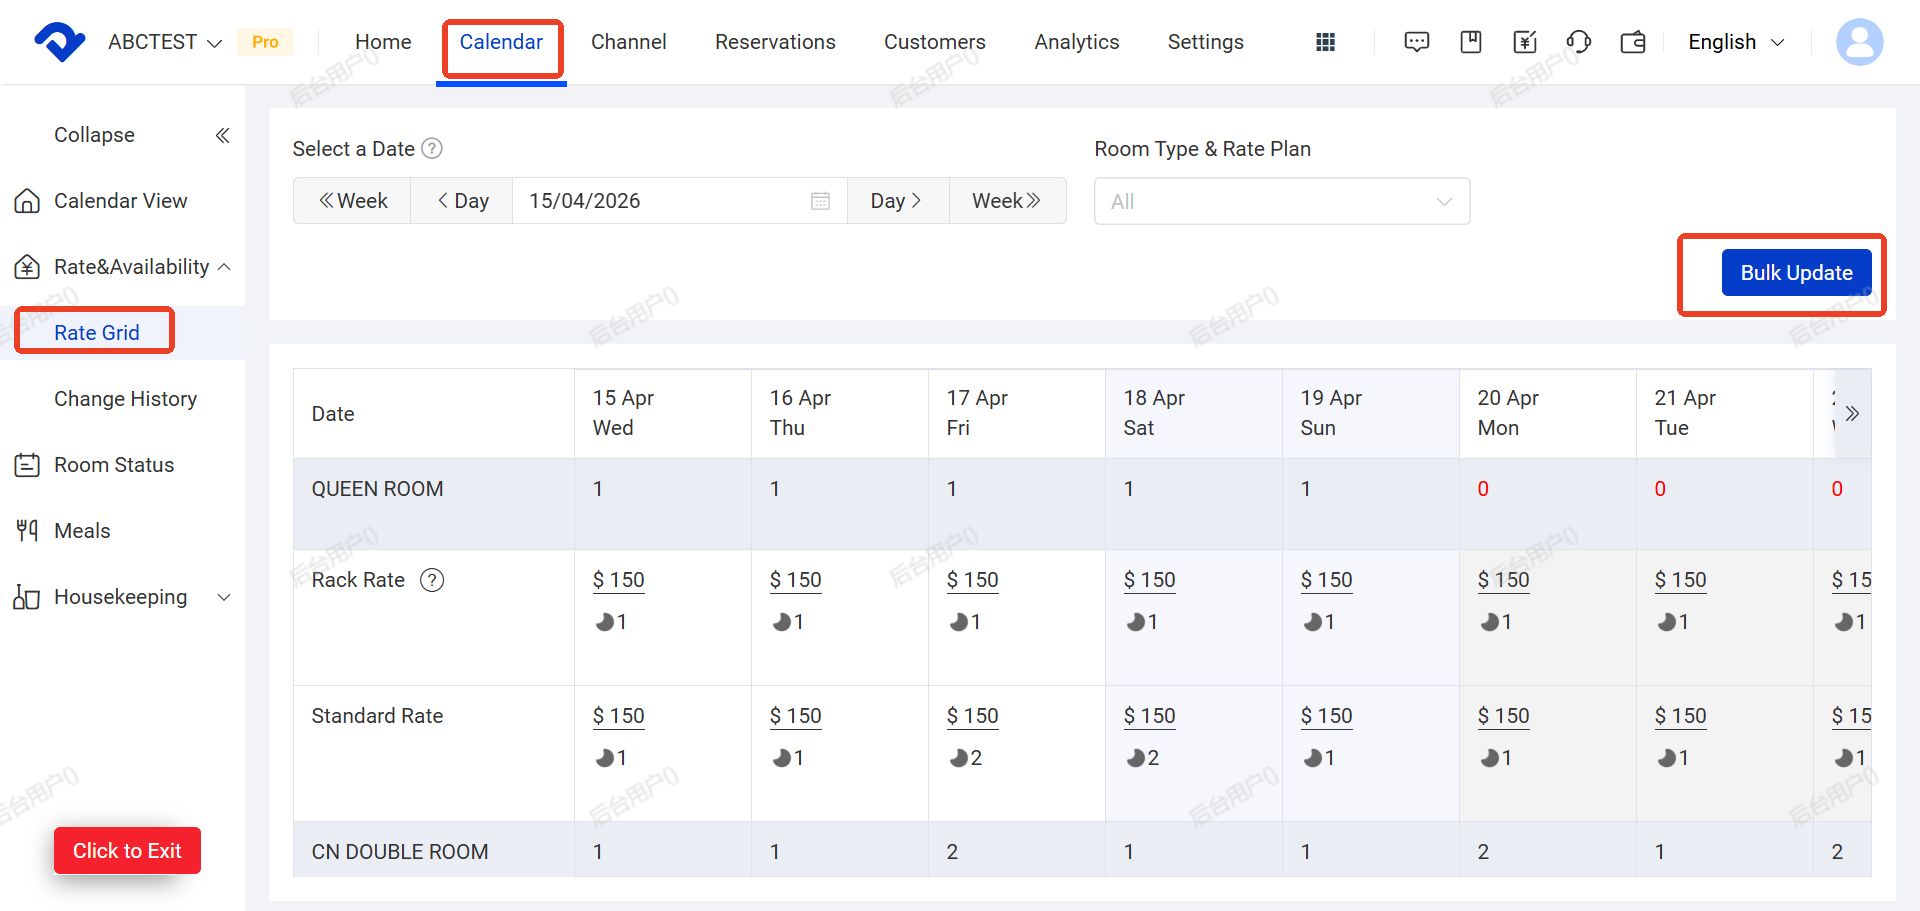
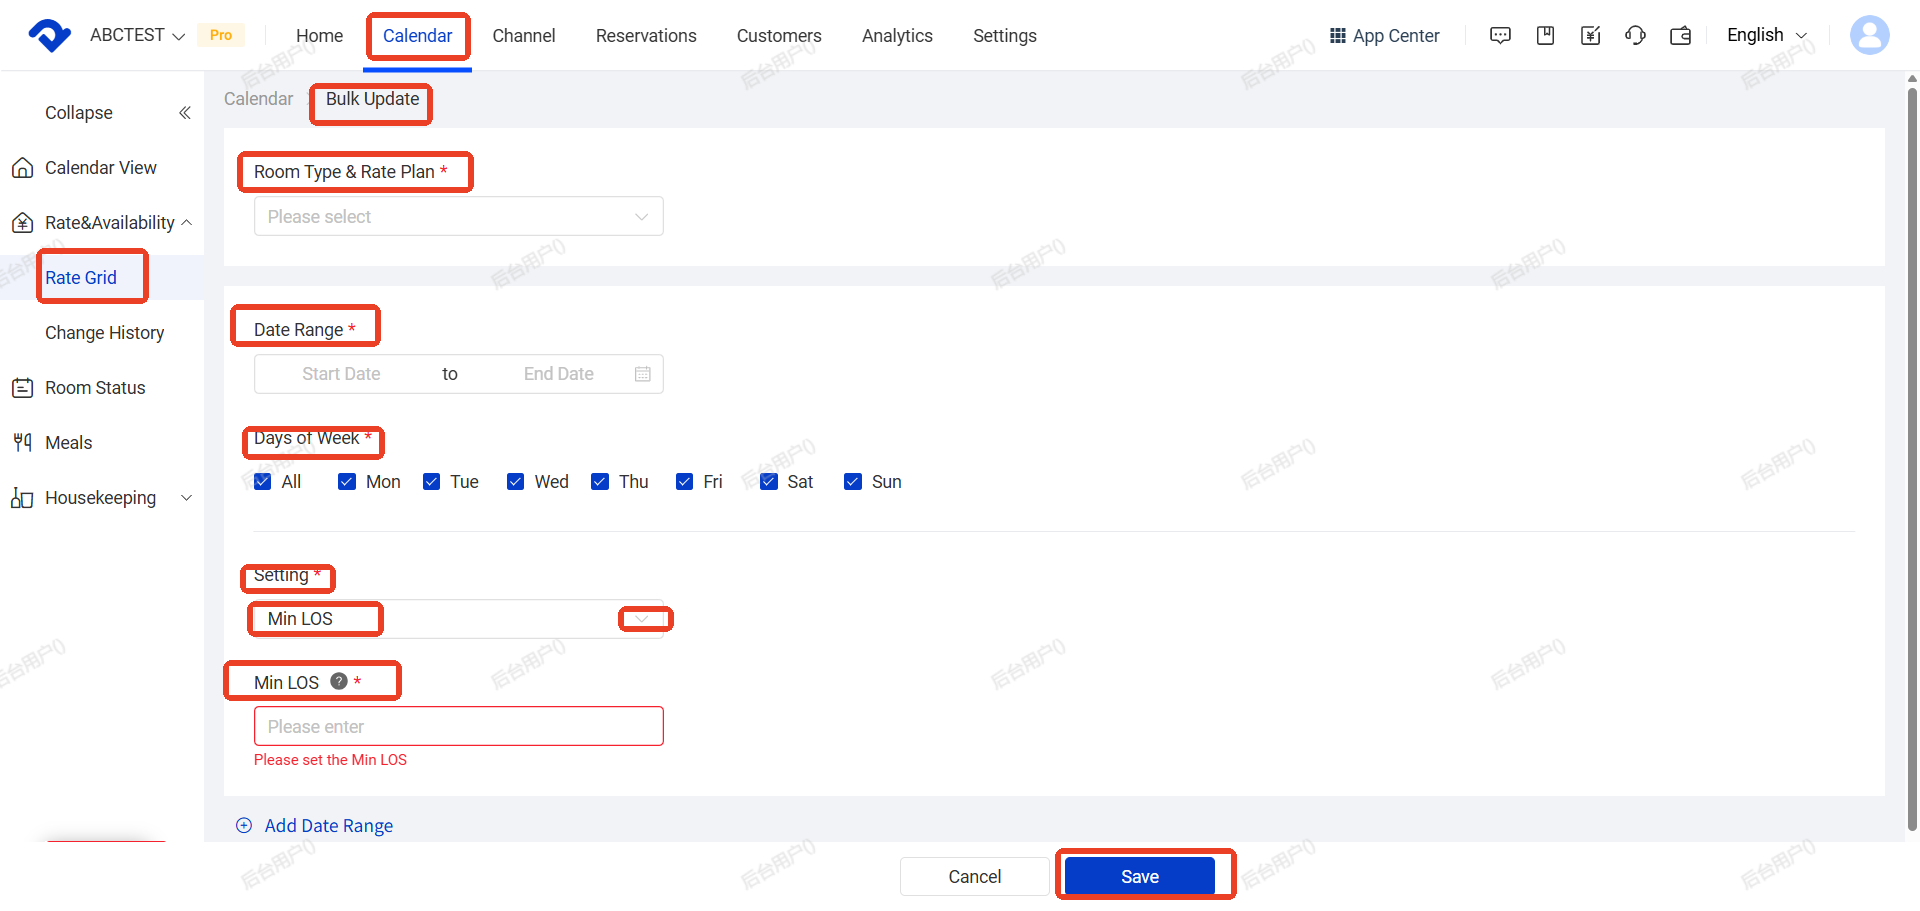
How to adjust standard rate: Go to Calendar→ Rate Grid →Bulk Update
- If you need multiple price plans, then create a new price plan only if you need to manage separate pricing strategies for different channels.You can go to Settings > Rate Plan > Add(A settings window will pop up.)to create.
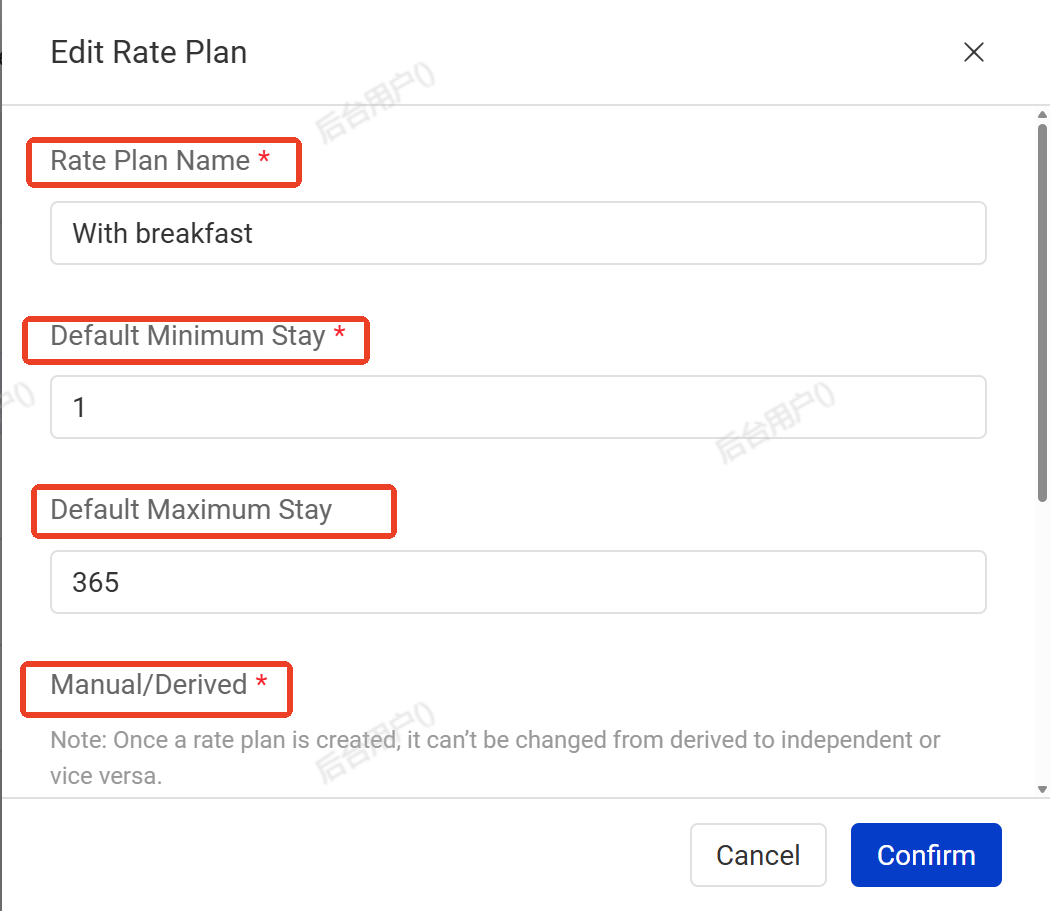
After clicking ‘’ADD”(A settings window will pop up),Fill in the following information in the pop-up window:
- Rate Plan Name: Enter a name for the new rate plan (e.g. “Weekend Rate”, “Long Stay Rate”)
- Default Minimum Stay: Set the default minimum number of nights
- Default Maximum Stay: Set the default maximum number of nights
- Manual/Derived: Choose whether to manually input rates or derive from another rate plan(like Stamdard Rate)
- Cancel Policy: Select the cancellation policy (e.g. Non-refundable,this policy applies only to bookings made through the Booking Engine and will not be synchronized to OTA platforms (e.g., Booking.com, Ctrip)
- Including Meals: Choose whether the rate includes meals or not
- After filling in all the required fields, click Confirm to save.

Noted:
You can still add promotions and discounts on the OTA side.
PMS only sends the base price. The final price on OTA = Base price + OTA promotions.
- After setting rate plans,then Select the room types to associate with this rate plan
- Set the Cancellation Policy (this applies to your direct booking channels only. OTA cancellation policies are still set on each OTA platform).
- If the rate plan includes meals or other fixed charges, click + Add to add the meal or other charge items included in the rate plan.
If the channel rate plan includes meals or other fixed charges, you can click + Add to add the meal or other charge items associated with that rate plan.
If the meal item has not been set up yet, please create the charge item first using the link below, then add it to the rate plan.


- Then click Confirm
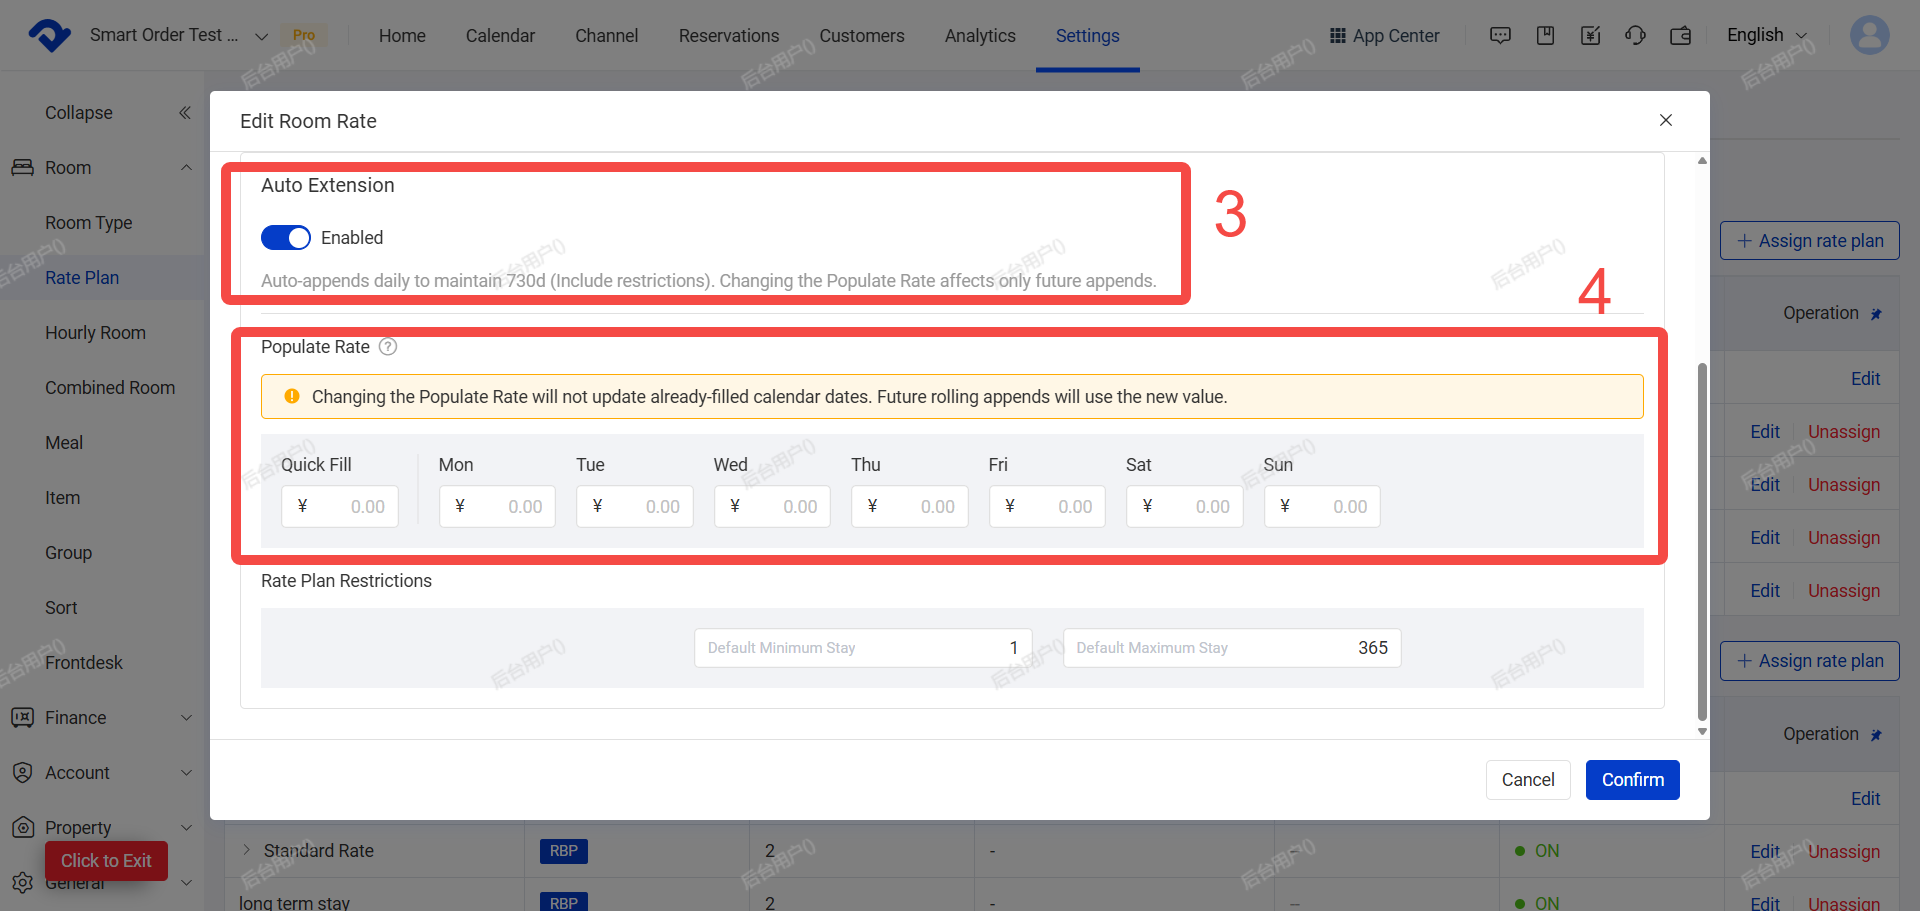
(c) Enable / Disable Auto Extend Default Room Rate
Path: Settings → Room → Rate Plan → Room Rate → Auto Extension→ Edit→ On/Off
When enabled, the system will automatically fill in prices for future dates, ensuring your calendar always has prices for the next 730 days. It will also apply your minimum/maximum length of stay rules consistently.
Important:
Changing the default room rate settings will only affect future automatically filled prices. It will not change any existing prices within the current 730 days.
Eg:
Today is June 1, 2025. With Auto Extend enabled, the system will automatically fill the price for June 1, 2027, based on your default room rate and minimum/maximum length of stay rules when the auto-extend task runs.
Disable Auto Extend
When disabled, the system will not automatically fill prices for future dates. You must manually maintain future prices to avoid affecting normal sales.
Note:
Dates without prices will show as “Not Set” in the Rate Management page. The system will also push “Stop Selling” to connected OTAs for those dates.
However, if Agoda or other channels have derived rate plans that are not mapped to PMS price plans and have independent pricing set in the OTA backend, those rate plans may continue to sell. To stop selling, you must manually close the dates in the OTA backend or use Bulk Close in the PMS Calendar.
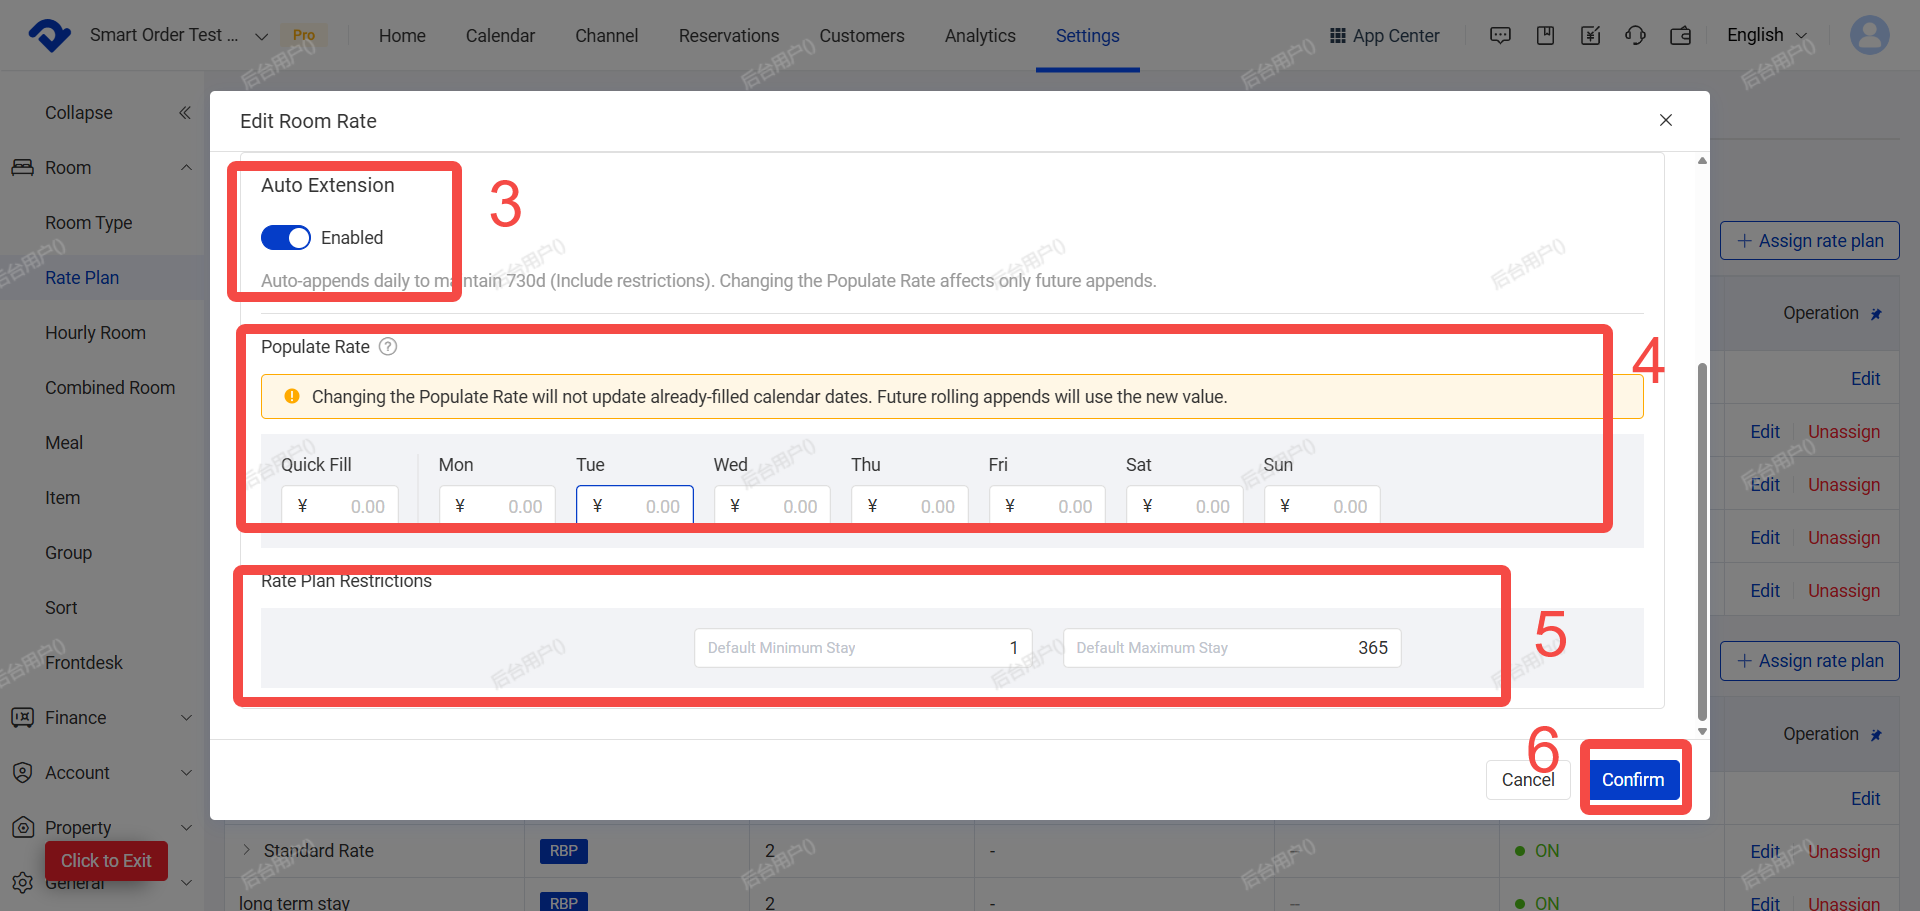
By default, the Auto Extend switch is turned OFF. How to Enable Auto Extend, please check the following:
- Go to Settings → Room → Rate Plan → Room Rate.
- Click Edit on the right price plan.
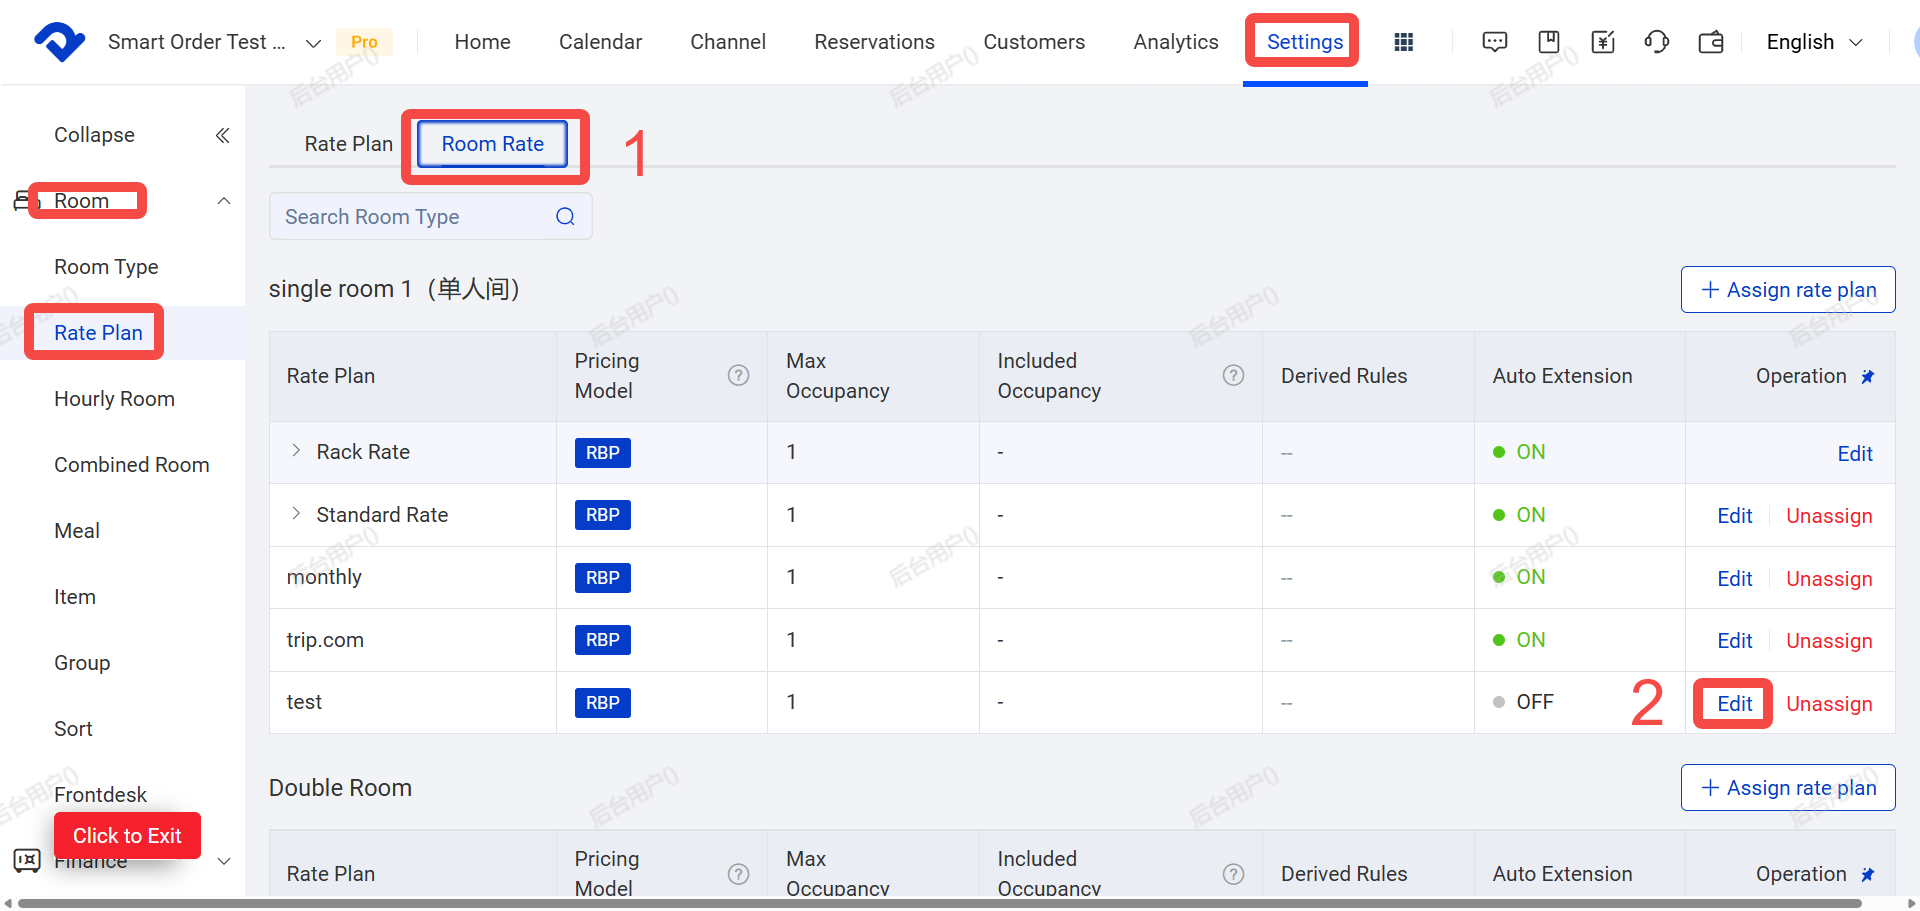
- Turn on the Auto Extend switch.
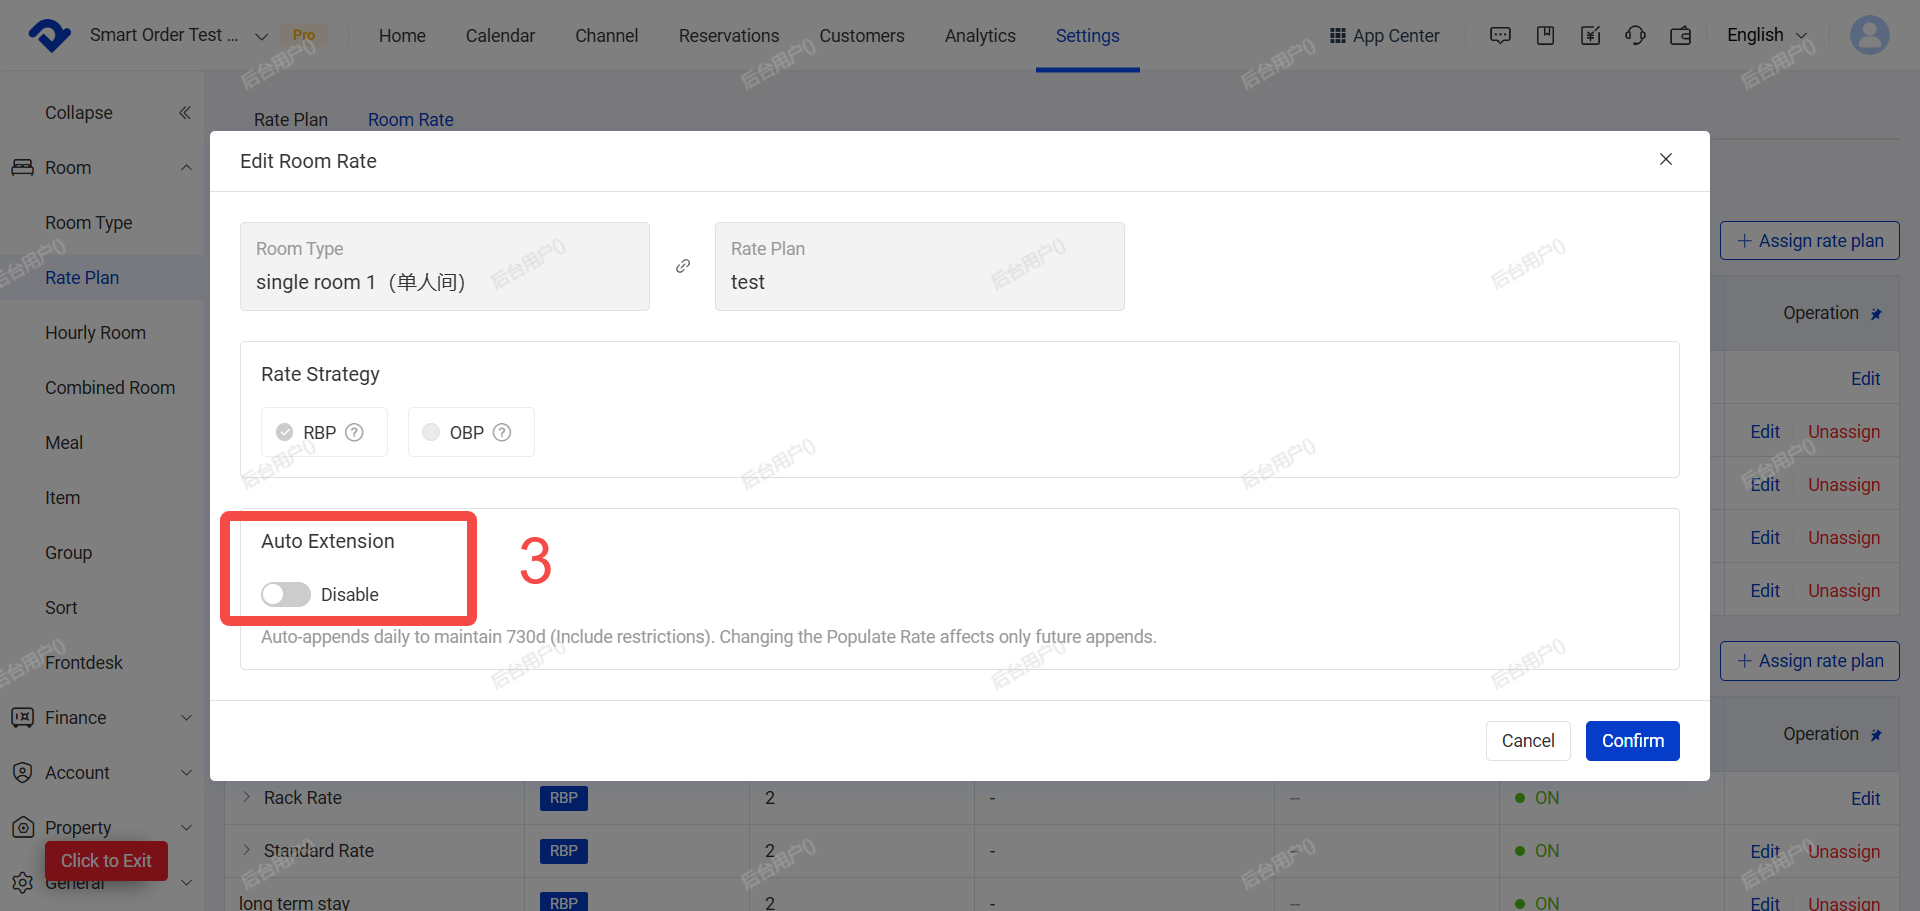
- Set the Default Fill Price.
The price set here is not the latest channel price. To set channel prices, please refer to the guide “How to Adjust Channel Prices”.
- Set the Minimum and Maximum Length of Stay limits.
- Click Confirm
III.Set Minimum / Maximum Length of Stay (Min LOS / Max LOS)
(A) Set your minimum and maximum stay requirements in PMS. These rules will be pushed to the OTA after connection.
(B) Path:Calendar > Rate Grid > Bulk Update> MIN LOS/MAX LOS
IV. Set Multiple Occupancy Rates (OBP)
(A) If you need to manage extra person charges centrally in PMS (especially when connecting to multiple channels), you can set up occupancy-based pricing here.
(B) Once set up extra person fee (multiple occupancy Rates) in PMS, then all channels must also be managed and set up in PMS. Currently Airbnb, Tujia, and Hostelworld usually do not support this feature in PMS.
(C) How to set up Multiple Occupancy Rates (OBP)
Settings → Rate Plan → Room Rates → Edit rate plan → Change pricing mode to OBP (Occupancy Based Pricing)
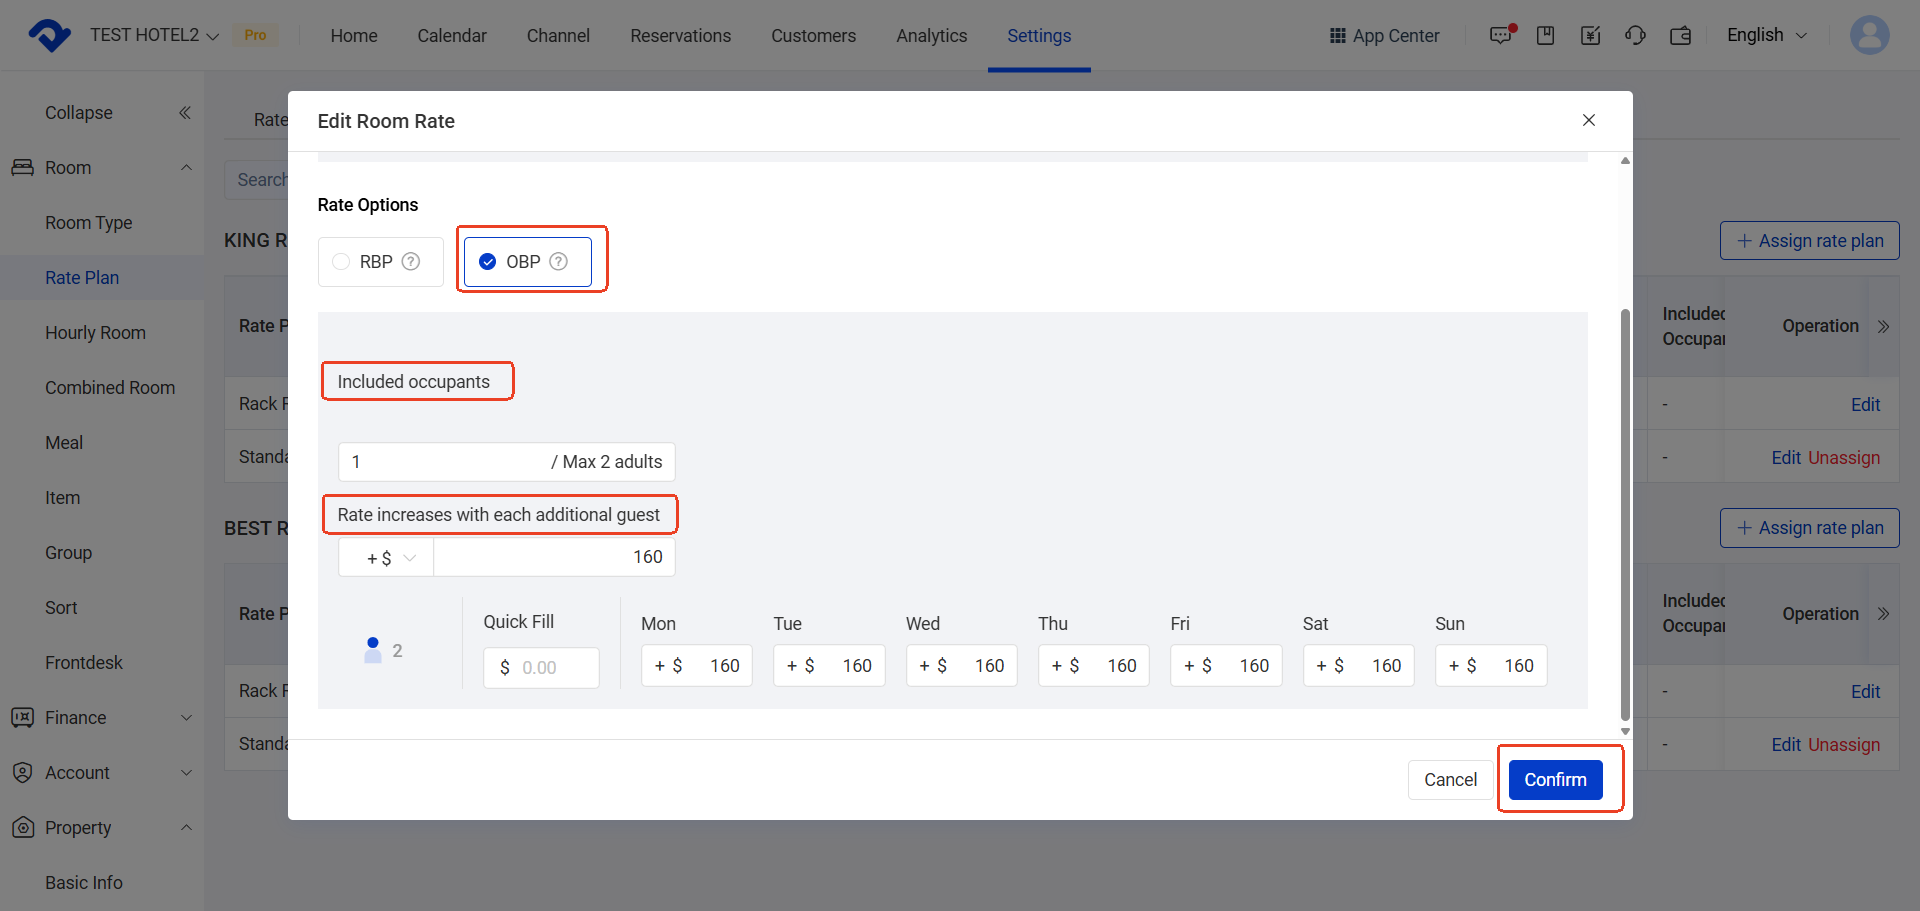
After Changing pricing mode to OBP(A settings window will pop up),Fill in the following information in the pop-up window:

V. Channel Price Ratio (Rate Multiplier)
(A) This feature allows you to adjust the final selling price sent to a specific OTA while still using the same pricing plan.
(B) How to set it: Channel→Rate Multiplier→Edit

VI. Room Inventory & Status (Very Important!)
(A) For the target OTA (e.g., Airbnb/Booking.com/ Tujia ): After setting up the channel connection and room mapping, use its “Import Future Bookings” feature. This will automatically sync its existing reservations to your PMS.
For all other OTA, before direct connection and mapping, make sure all future reservations with pending check-ins and check-outs are already entered in PMS. This ensures that the room status (like room availability )in PMS is the same as the OTA before the connection.
(B) What to do:
- OTA orders: Usually imported automatically (ask Smart Order team for help if needed)
- Offline / Non-OTA orders: Manually add them in the Room Status calendar or lock the room for the corresponding dates in the Room Status
How to Close or Open Rooms:
How to Manually Add a Booking:

